May 18

File this under the “probably-never-need-this-but-invaluable-on-the-day-you-do” category.

If you’ve been keeping your company’s accounting via Quickbooks and decide to start using the online banking feature that connects to your bank account to automatically grab transactions, you will run into a major annoyance for which there is currently no good solution. The online banking feature will grab the entire history of transactions from your account and keep them until you either add or match them. This would be fine if there was some way to remove the online retrievals that are duplicates for ones that have already cleared but you cannot match transactions that have already been reconciled and there is no “force delete” button. You’re basically stuck with no way to get rid of any of the transactions that were automatically pulled which have already cleared your bank.

I’m on Quickbooks Premier 2006 and I came up with a hack to remove these transactions and explained it briefly on the Intuit forums but I’m posting a mini-tutorial here because it was sufficiently-frustrating and the solution is anything but intuitive – I know of no other way around this problem short of voiding all your cleared transactions (which would be greater of the two evils). The essence of the hack is that you setup a dummy account called “Already reconciled transactions,” add the duplicates to that account to clear them from the match screen and then go through and manually delete all of them and lastly, delete that fake account. This is tedious but it does solve the problem so here goes:

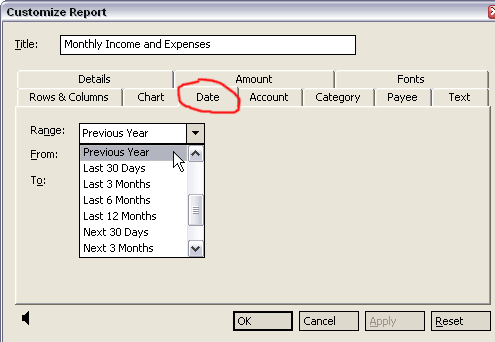
  1. Assuming you’ve already setup the dummy expense account titled “Already Reconciled” and you have successfully configured your quickbooks to talk to your bank, go to the online banking screen.
  2. Click the “Go Online” button to retrieve all the transactions from your bank.
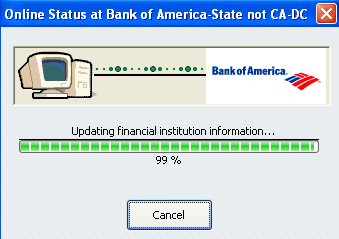
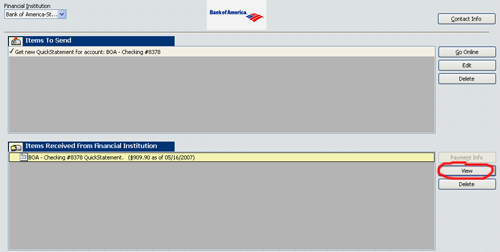
  3. You’ll see a dialogue like the following as Quickbooks connects to your bank and pulls the history.
  4. Now click the “view” button to review the transactions you just downloaded.
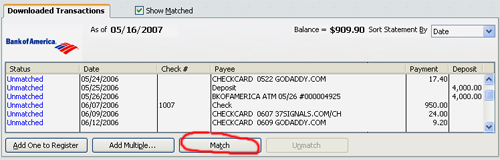
  5. On this screen you’ll have a ton of unmatched transactions. If you have any history of reconciled transactions in your Quickbooks this is problematic.
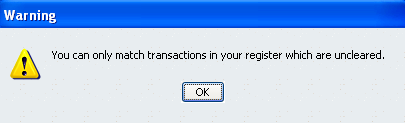
  6. Trying to match these with the ones that have already cleared produces the following error.
  7. Instead, add the transactions to the register one by one.
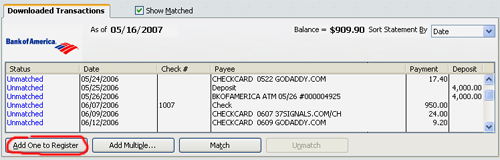
  8. And assign them to the fake “Already Reconciled” expense account you created.
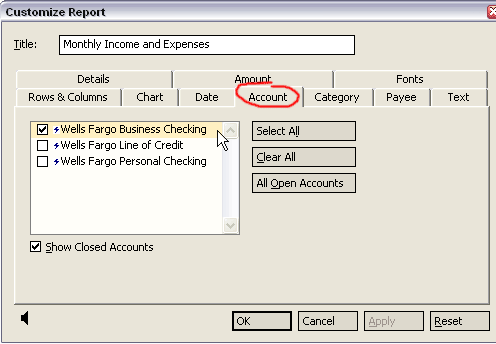
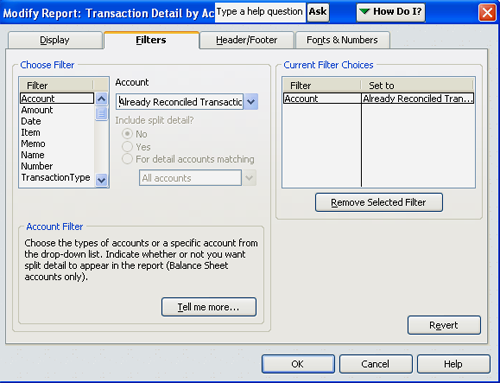
  9. This allows you to then go into your Chart of Accounts and do a custom report.
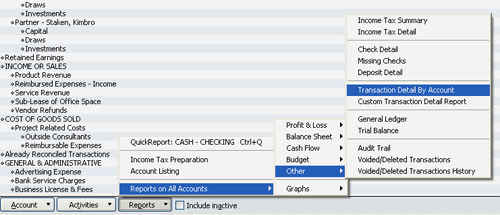
  10. Create a filter that pulls all the transactions from this fake account.
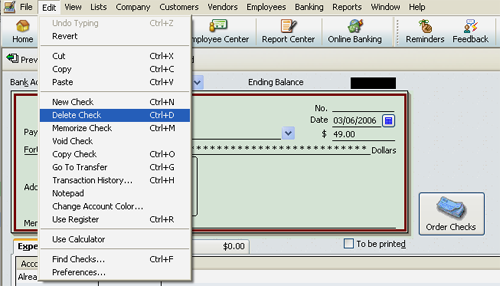
  11. Go into each of these transactions…
  12. And delete it. The last thing you’ll want to do is kill the fake account once you emptied it with all the duplicate transactions.

This is a hugely annoying way of dealing with the problem but at least it works. A simple button to “force delete” in when matching transactions would save all these steps. Hopefully Intuit will clue in to this issue and fix it in a future release.

Tagged with:
Jul 22

Del.icio.us is great. Here’s six ideas on how to get more out of it:

  1. pimpMyDelicious.jpgOffline browsing of your “toRead” items – Many people have a toRead tag they use to flag pages they plan to review later. Realistically with the massive daily influx of new info, I rarely get a chance to come back to these items when I’m on the computer.

    However, when I’m away from the computer waiting in a restaurant, having news feeds in my phone is perfect for killing time. Rather than read random news though, why not read what you already bookmarked? While most mobile phones support web browsing and you could do it that way, surfing over your phone’s connection sucks and this isn’t time-sensitive info we’re talking about since it clearly wasn’t critical enough for you to read it at the time you bookmarked it. Instead, use an offline reader like Avantgo to cache these items each time you sync your phone. Create a free account, download and install their client to your phone, login and get the autochannel bookmarklet here and then navigate to your toRead page. Use the autochannel bookmarklet to add this to your phone, set the link depth to “1” and check the box to “follow off-site links.” This will grab your latest list of toRead items and cache them to your phone each time you sync.

  2. Private saving for ubiquitous admin access – One of the advantages of using del.icio.us for your bookmarks is that you have access to them from any computer. You may have bookmarks to administrative features or sensitive info that you don’t want to share publicly though. Use the “private saving” feature in del.icio.us to conceal these bookmarks. You have to first enable it in under “settings > experimental > private saving.” Once you do this you’ll have a new checkbox on your posting interface in the upper-right that says “do not share” – this will make it so only when you’re logged into your account can you see these bookmarks.
  3. Mind read your mentors – If you’re reading this then we already know you read blogs. And odds are that you have a few people you follow regularly who are consistently on-point with their thinking and what they explore and write about – your mentors. Unlike reading their blog though (the things they explicitly tell you) you can find their del.icio.us account and monitor it via RSS to follow their latest bookmarks. There’s a link at the bottom of every page on del.icio.us that allows you to get a feed of things that change. In this way, you know not just what these alphanerds are saying but also what they’re thinking about.
  4. Expose yourself – The reciprocal thought to the above is that as an author of a blog yourself, you can expose your own bookmarks via your blog and make it easy for others to see what you’re thinking about. There are tons of options on how to pull this off. Personally I dislike the XML-RPC method of auto-posting del.icio.us links as blog entries – I prefer the linkroll javascript method of displaying the list in the nav as it keeps the most current ones on every page of your blog and doesn’t push them via RSS to people who just want to read what you write. They can always use the method above if they want to subscribe to your del.icio.us feed.
  5. Watch the watchers – Be a bit of a “del.icio.us voyeur” and find out who has bookmarked things you’ve written and see what else these people are reading. You achieve this by finding an entry of yours that has been bookmarked by others and looking under the posting history column on the right to see the linked usernames. Clicking through theses user names will show you their account allow you to see other stuff they follow.
  6. Create an open public dialogue on your site – Chris Pirillo proposed the idea of “freedbacking” recently whereby site owners encourage their visitors to tag their pages with the term “freedbacking” and make comments in the notes field to enable public feedback viewable to all. This is essentially what we’ve been doing on our Grid7 site since January via an iFrame on this page. You can do the same on your site and create this type of open public dialogue with your visitors. Keep in mind they may say bad things about you and it will appear on your site but doing it this way creates a “public whipping post” and forces you to deal with it immediately at risk of continued public embarrasment. Ultimately this creates an active community and more loyal following around your offering because people know you aren’t burying their criticisms and feedback.

It goes without saying that the Firefox extension for del.icio.us is a must if you post enough and as long as you’re at it, you might as well snag the FF Better Search extension so you have thumbnail images on all your del.icio.us links. If you’re new to del.icio.us and have a bunch of existing bookmarks from your web browser, you can use their nifty import feature to move all your bookmarks over and have it assign the most popular tags to the ones it already knows about. I don’t use their network feature because it doesn’t get me anything I can’t do via RSS. The people who I want to monitor I just follow individually via RSS by creating a “del.icio.us recon” folder in my bloglines and subscribing to each of their feeds. It’s better because they are now separated out by individual rather than being munged into one big list and they still have chronology.

If you have other ideas for how to get more out of del.icio.us, please share them in the comments section.

Jun 04

BlogCFC2WPlogo1.gifI looked around for a migration script to port my blog from BlogCFC over to WordPress and didn’t find anything so I wrote one. First lemme say that BlogCFC is a great piece of software and I don’t want to encourage anyone to move away from it. For myself the decision to move to WP was one of those “eat your own dogfood” choices. 100% of the stuff we’re building at Grid7 right now is centered around Structured Blogging and Microcontent. WordPress and Moveable Type are currently the only two authoring tools that have plugins that support this. For me to advocate microcontent without having the ability to publish it would be like Ray advocating BlogCFC and hosting his own blog on WordPress. Plus removing barriers to exit on a piece of software should theoretically increase the adoption of its usage because people can now safely use it knowing that they aren’t locked in permanently. Anyways, I asked Ray if he was cool with me releasing this code and he had no problem with it. There is a Readme included but basically here’s what you do:

Download the BlogCFC2Wordpress.zip file

  1. Setup a new instance of WordPress (you’ll need to be able to run CF and PHP side by side)
  2. Configure a datasource in CF administrator for your new WordPress db.
  3. Extract the contents of the zip file to a directory on your site
  4. Modify the config.ini file to reflect the source and target datasources
  5. Provided you want a fresh install you should clear out the dummy data that comes with WP
  6. Run the RunMe.cfm file
  7. Delete the BlogCFC2Wordpress directory
  8. Two optional last steps
    1. put the rss.cfm file in the root of your wordpress blog to keep all your old subscribers
    2. put the index.cfm and qBlogCFCPosts.xml files in your root to handle redirects for all your old links

Provided that it worked you should see a screen that looks like this->

BlogCFC2WPscreenshot1.gif

Obviously you’ll need to mimic the directory structure of your BlogCFC instance so all the files referenced in your posts continue to work. I just moved my downloads and images directories over and it worked fine. I updated the stylesheet to include the .code classes so inline code would display properly. There were some weird idiosyncracies with the way that the inline embedded flash player was handled by WordPress/php but that was really the only gotcha and I just referenced it in a new window on entries where it broke (it was something to do with the tag). If you do the last two steps your users should never have to change anything and all your legacy links should continue to work.

The code is actually commented (i know, crazy right?) and makes heavy use of components so it may have some instructional value. There’s some other nuggets in there and one technique in particular that I’ve started doing (and I don’t know whether this equates to CFUnit or another type of unit testing – i’m admittedly horrible about not writing unit tests) but it’s been a time-saver on another project where I’m dealing with a long sequence of calling various components that access external systems to get the objects I need to do an operation. Basically it’s a few lines of code that lets you serialize the object and write it to a file so that for testing rather than calling the components each time, you can instead read the file and deserialize it to create the same object so it behaves as if it were getting it from the prior sequence. This may be old hat for others but it’s a technique that has saved me time and the pain of repeatedly clearing out database entries.

The performance of the migration script is fine for me (it took 13secs to move 73 posts, 75 comments, 130 category mappings and 18 categories). It’s admittedly not optimized (I prefer the syntax and I realize it instantiates the component on each request under this method). There’s plenty of room for improving this with the function-style syntax for instantiating objects and for someone like Ray who has 5000+ posts you might have to (or else bump your Timeout in the CFadmin) but it worked fine for me and I have no desire to do this. I’ve tested it against CFMX7, MySQL 4.1 and Win2k3 with BlogCFC v. 3.8 to WP v.2. There are some new fields in the latest version of BlogCFC so you would need to make a few minor modifications to the query syntax but it should be pretty painless. Also the sql is vanilla with no stored procs (all the logic is in the cfc’s) so it should also work with other databases like Postgres or MSSQL and it should run fine on BlueDragon. It should be noted that I did end up using a queryToArray utility found here and this is embedded in a util component in the distribution.

The usual discalimer applies on this code – backup your WP db before you use it if there’s anything that is worth saving! I’m not providing support on the code. You can repost it and take it apart and make it better if you want but please leave the original comments and license intact. It’s the MIT license which is as close to having no license as you can get.

One thing – I was on the fence about using feedburner because athough I wanted the stats and the other promotional and convenience features they offer, I didn’t like the idea of promoting an RSS link I don’t have control over (ie. they decide to start charging and have you hostage by having control over your feed). My partner came up with the great idea to use a link that redirects to feedburner. Simple and genius.

Big ups to Ray Camden and Matt Mullenweg for writing useful Blog authoring tools. Hopefully this migration utility makes both products more accessible to others.

Oh, and in the never-ending pursuit to master the art of the tripodless qtvr, I took one yesterday in the middle of the pool at this pool party we went to on the side of Camelback Mountain. It was like the house they blew up in Lethal Weapon 2 and it was was every bit as ridiculous as it looks.

altitudePoolPartyQTVR1.jpg
Mar 15

Quicktime Virtual Reality Panoramas are immersive scenes that show a 360deg view of one’s surroundings. There are high-end solutions for creating these scenes that utilize special optics and tripods but you can also create a decent one using the digital camera you already own. I’m down in Mexico once again working from the road and enjoying spring break. My buddy Dave has a beach house here in Rosarito and a few of us shot this QTVR last night from his rooftop:

Here’s the simple recipe for how we did it using my Canon SD550 digital camera:

  1. Setup the scene – You’re going for 30deg separation on each shot – you need a way of aligning the scene so you can shoot 12 images equidistant around the “clockface” where you are standing. If you’re in sand you can actually draw a clockface on the ground and align each shot on its corresponding numeral, otherwise you’ll need to find orthogonal objects to give you a reference for the “12, 3, 6 and 9” positions and estimate 1/3rd the distance between each for the intermediary pics. I was standing on tile so that made it easy.
  2. Shoot the pics – the goal is to produce a sequence of images in perfect vertical alignment with a minimal change in brightness amongst each pic. Hold the camera vertically, focus and shoot one pic on each of the twelve numerals of the clockface. If you’re on a slope, you want the camera perpendicular to the sky and not to the slope (if you position relative to the slope you’ll end up with a QTVR that looks like a sine curve). I generally disable the flash unless there’s bright sunlight raking from an angle and you need to compensate for the objects in shadow. You want to hold the camera at the same vertical height as you spin around.
  3. Produce the movie – there are tons of options but I found a $70 shareware windows app called Panorama Factory by Smoky City Design that does an amazing job of intelligently splicing the photos to produce the final scene. Import the twelve photos you just shot into the program and follow the cues in the wizard using all the standard defaults. You’ll need to rotate your sequence of images unless your digital camera does this automatically for you – Panorama Factory has an option on import to do this automatically. You’ll step through a series of about 6 screens on the wizard and arrive at a point where it lets you save the final image. Choose the QTVR option and jpg compression and adjust the slider for quality depending on the delivery format (CD or Web) and how small you want to make the final file.

That’s it. Once you perfect the process of creating the QTVR, try experimenting with the advanced hotspot features to create a series of linked scenes that make a full virtual tour. Some camera vendors bundle QTVR software with their products – it’s probably a good idea to check the software that came with your camera before buying anything extra.

© 2005 Lights Out Production – All Rights Reserved Worldwide

Tagged with:
Feb 23

Hopefully this trick is useful to anyone doing taxes right now and using MS Money. MS Money is probably the only M$ product I really like. I switched this past year from using Quickbooks to running all my accounting through MS Money and it’s been _way_ easier. I don’t know the proper accounting jargon for how they’re different (as far as I understand, both are double-entry accounting programs but MS Money just auto-handles one side of the equation and assumes it’s crediting cash). Both can integrate with your bank account but I never figured out how to do what I wanted with QB which was to NOT have to enter each transaction manually in two places. MS Money pulls transactions automatically from my bank so all I have to do is go through and reconcile with my paper bank statement at the end of the month so that means less work. Plus it can be “taught” what categories the expenses are and it gradually learns to categorize them on its own. Anyways, this is not a commercial for a M$ product though- it’s a tip for creating a report which they don’t give you out of the box.

Your accountant will probably ask you for a general ledger first thing. For whatever reason MSMoney does not have this as a canned report and looking all through the Microsoft.com site and googling for a tutorial on how to do create one produced no results (I’m using 2003 Deluxe btw- I read all kinds of bad reviews of the latest version). So we waded through a few of the report screens until we figured out how to customize one of the pre-packaged reports to give us what we needed. Here’s what we did:

Fire it up and go to the reports tab:

Choose the Monthly Income and Expenses report:

You’ll get this ridiculous pie chart (which is about as useful to your accountant as a fingerpainting – that’s okay, we’ll fix it).

In the left menu, change the view from Pie chart to Report

This gives us tabular data but is still not useful because we need to specify the date range:

We also need to limit the report to pull from only the account we’re interested in. I have both my personal and business accounts connected to MS Money which is nice for managing things in one place but for the purposes of reporting your business taxes, clearly you want to separate them out.

Okay, good deal- so now we have a general ledger report within MSMoney for the business account for the past year. This doesn’t do my accountant any good though since he doesn’t have this program. We need to export this report to excel.

On the left menu, yea…

And there you have a pretty spreadsheet that contains all the data from our MS Money report and that can be used by any accountant who has excel (and even notepad, but then again if your accountant doesn’t have excel, you’ve got bigger issues ;-)

I’m sure Quickbooks is more appropriate for some businesses but mine is pretty simple and for me the priority is minimizing the time I have to devote to tedious tasks like data entry and still retain useful reporting features and being able to give my accountant whatever as needs as quickly as possible. HTH

-sean

© 2005 Lights Out Production – All Rights Reserved Worldwide

Tagged with:
Dec 02

If you use Gmail and are on LinkedIn, here’s a neat trick you can use to “excavate” your gmail correspondence for LinkedIn connections. LinkedIn already has an Outlook toolbar that will scour your sent folder in Outlook to do this (which is great if you use outlook as your email client but unfortunately there has been no equivalent for Gmailers that only use the web interface). Well now there is.

You may not be aware that Gmail automatically records the name and email address of anyone to whom you send a message in your contacts. There’s now a feature that allows you to export these contacts in an Outlook CSV file which you can then upload to your LinkedIn account. It will then show you who of those contacts is already on LinkedIn and allow you to invite those people to your network. Here’s the exact steps to make it work:

  1. In Gmail, click the “Contacts” folder on the left. Then click “Export” on the upper right. Choose the Outlook CSV option.
  2. Now go to your LinkedIn account and click on the “My Contacts” tab. Choose the “Other Contacts” sub tab and then click on “upload contacts” in the upper right.
  3. Follow the instructions to verify the contacts are correct. Now when looking at your contacts you should see something like this:
  4. Follow that link and you should see a list of all your contacts that are currently on LinkedIn. Now you just invite them to join your network.

Depending on how you use your LinkedIn account, you may want to be more or less stringent with who you invite. I treat mine fairly sacredly and only connect with the people that I personally know well enough where I would feel comfortable vouching for their capabilities.

This method boosted my contacts ten-fold and I discovered a bunch of people that I deal with daily who are already on LinkedIn. HTH

-sean

© 2005 Lights Out Production – All Rights Reserved Worldwide

preload preload preload